📌 poko is in early Alpha. It is incomplete and things may change or break unexpectedly. We will try and document changes from version to version though. Also, you keep control on your update cycle since only you can update your github fork. So check the changelog before you update.
🗨️ Ask questions! While we work on the docs, come and ask questions in the Github discussions.
A static website
poko creates a static website. It is purely composed of static files. It is fast. It is lightweight. It is green. It is very secure. It requires zero maintenance.
Changes in Notion are not reflected dynamically on your website though (when using the normal build setup). When you made some changes in Notion, simply rebuild your site to see how it looks on your website.
[TODO] more details about building with static hosts + Bookmarklet + advanced dev workflow: watch for changes with something like Stackblitz
Content edition
Just write content in Notion as you normally would. Most text formatting works as expected.
Child pages are ignored by default because there is no way to prevent Notion from showing them on the parent page. (This can be customized though)
Nesting blocks will mostly be ignored on the output, except for ordered and unordered lists (numbered and bulleted lists). Use nesting as you please to organize your content.
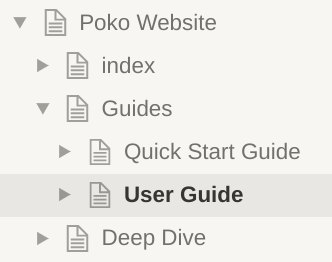
Pages and URLs
Your website structure can be seen as a tree in the sidebar.
-
The top-level Notion page is considered the
settingsof your project (see Global Settings bellow).-
index->/Your home page has to be a direct child page called "index". It has nopath, which means its URL will be your bare domain. -
Deep Dive->/deep-diveAny other direct child page will have apathequivalent to a "purified" version of the Notion page name.Even Deeper->/deep-dive/even-deeperThepathof any sub-page will inherit the first portion from its parents.
-
Direct / Sub / Page->/direct/sub/pageThe character/is allowed in page names and will be kept in the path.
-
Props
Every page can receive properties. We call them props.
Props are variables. You define them once and can use their values many times keeping only one source of truth.
Imagine you are using the current year many times throughout the site and when the new year comes, you need to change every instance of that year to reflect the new one. Instead, setup a prop at the root of your project with the current year and you will only have to change its value there.
Props can be used throughout the page by encapsulating their call in curly braces.
For example writing {props.title} (without the code fences) on this page yields -> User Guide
Props can be defined in 3 ways:
-
In a database, Notion properties are converted to props. You can use 'dot notation' for nested props, for example, you could have a property named
metadata.title= "User Guide" that would be equivalent to theYAMLexample bellow. -
In a
YAMLcode block at the top of the page (= frontmatter) (Here is a cheatsheet to writeYAMLif needed)year: 2022 metadata: title: User Guide -
With the keyword
exportanywhere on a page (see Exports bellow)
Special props
-
titleis populated automatically from the Notion page name or the property of type 'Title' if the page is part of a database. If the Notion page title is 'index', the page will take up its title from the direct parent (It is assumed that this is the homepage in this case, so the title will be the title of the settings page). Can be overwritten of course. -
metadata-
lang[string: 'en'] -><html {lang}> -
siteName[string: undefined] Used to compose meta title as{title} | {siteName} -
title[string: undefined] -><title>...&<meta property="og:title"... -
description[string: undefined] -><meta name="description"...&<meta property="og:description"... -
link[array: undefined] -> Array of objects describing<link>tags (see example) -
meta[array: undefined] -> Array of objects describing<meta>tags (see example) -
<any>[object: undefined] -> Object describing any html tag to be inserted in the<head>. Need to have atagproperty. You can give the object any name (=key) you'd like. Just make sure it does not collide with other keys on themetadataobject. The key will be embedded in the element you create as andata-keyattribute. Example:ogType: {tag: meta, property: "og:type", content: website}will yield<meta data-key="ogType" property="og:type" content="website">
-
-
jsonld[object: undefined] will generate a<script type="application/ld+json">for structured data. -
childrencontains the content of the block, either some inline markup or a list of blocks nested inside the current block. -
<html-element-name>[object: undefined] -> Props to be passed to every instances of that element -
style[string: ""] -> An inline<style>tag for the current page -
headChildren[array: undefined] Array of objects describing tags to be injected in the<head>. The objects definitions are similar tometadata.<any>. -
bodyChildren[array: undefined] idem but injected at the end of the<body>. -
_children[object: undefined] are props to be passed to all children pages (but not necessarily to self). It allows for example to override the cascade behavior or passing some information to all children without applying on oneself. (See Props Cascade -
status[string: undefined] for now, only a value ofdraftwill have an effect. The page will not be rendered on the site. (NOTE: this prop does cascade)
Automatic Props
-
titleis populated automatically from the Notion page name or the property of type 'Title' if the page is part of a database. If the Notion page title is 'index', the page will take up its title from the direct parent (It is assumed that this is the homepage in this case, so the title will be the title of the settings page). Can be overwritten of course. -
componentscontains the list of components that can be used throughout the site. If you want to create a component, just create a prop as a function or a string. All props matching this criteria will be usable as components. -
poko[object: website data] is all of your website's data that is passed automatically to every component (see Poko Data). -
rawcontains the Notion properties as they are fetched from the API, untouched -
selfcontains only the props that are set on the current page. It is not affected by the cascade
Props Conventions
These are not hard coded but having conventions can help creating components 'n stuff…
-
featuredImageorjsonld.imageorjsonld.image[0]should be the main image representing the page -
authororjsonld.author.nameorjsonld.authoris the author (of an article etc) -
datePublishedorjsonld.datePublished.startorjsonld.datePublishedis the publication date -
dateModifiedorjsonld.dateModified.startorjsonld.dateModifiedis the last modification date -
… More to come …
Poko Data
The poko prop contains all your website's data.
-
poko-
settings -
pagesall pages of your site -
pagethe current page data -
filesall files and images downloaded from Notion onto your site -
pathsthe mapping of all your pages paths with the corresponding Notion links -
websiteTreethe whole tree of settings, pages, blocks and inline content -
utilssome utility functions
-
Exports
You can export 'things' on any page. Variables, functions, components can be exported to be retrieved and reused across the page or even site wide.
We use MDX and Preact under the hood. Don't hesitate to geek on these and go check their docs.
If you export components with names corresponding to an HTML element, these will be used instead of the standard element (or instead of the component provided by poko by default).
Exports examples
export const p = ({ style, ...props }) =>  <p style={{ backgroundColor: 'yellow', ...style }} {...props} />
export const Thing = () => <>world</>
export const name = `m4rrc0`;
export const Style = () => <style>{`
nav {background-color: lightblue;}
`}</style>

// Then you can use all those exports like so

<Style />

# Hello <Thing />, I'm {name}

// Note that 'Thing' is defined as a function above and is a component.
// 'name' is defined as a string. That is why we can simply use it with { }

Normal Text like this will be turned into a paragraph (<p>) and use the `p` export defined above.
⚠️ Be mindful of how you write
exports. Theexportkeyword cannot be nested under another block for example. If MDX refuses to process your export, look at the build log, we provide a dozen lines of Markdown. The (first) mistake MDX encounters should be in the middle of the printed output.
📌 You can write
exportfunctions in a Toggle. This is the most convenient way we have found so far to avoid clutter. (See in the Notion template for examples)
Props Cascade
Props will be passed down the tree from a parent Notion page to its children. Props are 'deep merged', meaning that even nested props and arrays are merged.
There are a few exceptions to this behavior:
-
metadata: only the settings' metadata are merged with the current page -
jsonld: only the settings' jsonld data is merged with the current page -
children: not merged at all -
_childrenare props to be passed down to children. It is retrievable on the current page through something likeprops._children.myPropand is merged into the main props of children. So a direct child page will be able to retrieve the prop withprops.myProp. -
selfis populated automatically with only the props from the current page. It is not affected by the cascade.
If you want to stop some props from propagating, you can nullify them on the children.
Avoiding the cascade
style: "p { color: red }"
_children:
  style: "" # avoid passing the styles to children
Components
We build pages by composing components. This is really useful because it allows changing the styles and functionality of each page part by part.
Work in Progress
Smart conventions will allow easy theming and customizing just the parts of the pages you need to change.
[TODO] Expand on the concept and provide conventions
Global Settings
Every data that should be applied to the whole site should be set in the root Notion page of your project. This is where you will be able to define themes, import files, … That is basically the backstage of your website where your set everything up for the show to happen with minimal efforts.
Global Styles
A CSS code block can be used in the settings to write global styles. These will be written to a user-styles.css file and imported in the main layout of your site.
Simply write CSS.
p {
	/* color: red; */
}
If you would rather use a CSS framework, the easiest solution is to import it directly. See Head.
If you would rather write some CSS in a file, upload it with your site and import it, see Static Files.
Head
Anything to put in the <head> of every page can be setup in a HTML code block in the settings.
<!-- Icons generated on https://realfavicongenerator.net/favicon_result?file_id=p1g260b67s1r7moae1c88via1odj6 -->
<link rel="apple-touch-icon" sizes="180x180" href="/user-assets/apple-touch-icon.png">
<link rel="icon" type="image/png" sizes="32x32" href="/user-assets/favicon-32x32.png">
<link rel="icon" type="image/png" sizes="16x16" href="/user-assets/favicon-16x16.png">
<link rel="manifest" href="/user-assets/site.webmanifest">
<link rel="mask-icon" href="/user-assets/safari-pinned-tab.svg" color="#5bbad5">
<link rel="shortcut icon" href="/user-assets/favicon.ico">
<meta name="msapplication-TileColor" content="#2b5797">
<meta name="msapplication-config" content="/user-assets/browserconfig.xml">
<meta name="theme-color" content="#ffffff">

<!-- Example of a CSS framework -> Pico CSS: https://picocss.com/ -->
<!-- Preconnect -->
<link rel="preconnect" href="https://unpkg.com/" />
<!-- Pico CSS - Classic version -->
<link rel="stylesheet" href="https://unpkg.com/@picocss/pico@latest/css/pico.min.css">
Favicon
There are tools that will allow you to automatically generate HTML tags and files necessary for your site's icons. For example realfavicongenerator.net. Simply copy/paste the html in the Head and upload your zip file to Notion in your Settings page.
Static Files
These will be automatically loaded as is with your built site in a directory /user-assets/.
Zip files will be unzipped alongside the zip file itself.
If you need a folder structure, you can zip your folders. Just make sure your files and folders names don't collide.
Images
Images you upload to Notion are automatically copied locally with your site.
The caption will be used as alt attribute. Use it as much as possible. This is a good practice of the web. Only avoid alt for purely decorative images.
[TODO] Provide best practices to handle images and style them
Collections
⛔ Don't use Notion databases in independent pages for now. Use inline databases instead.
Inline databases will be displayed as a list of <article> elements by default with links to the corresponding page. Everything can be changed by overriding desired components.
Child pages with a status = "draft" will be skipped in the list.
[TODO] expand on explanations
Hiding content
You can hide content from any page by wrapping it between {/* and */}. If some content is not ready yet or you want to keep some info for yourself next to something on your website, just use these tags.
For example, These lines would not show up on the page.
{/* This line would not render. */}
{/*Everything
between
these tags
won't render either.
*/}
📌 This is only true when using the MDX Renderer. If you don't know what this means, you are using it.
⚠️ Be mindful of nesting! Any closing tag will close the outer most opening tag.
{/* This would be hidden
{/* This would be hidden as well. */} ← and this tag is closing the first one at the line above.
So this would show on the page and probably even break your website build.
This would show as well, including the following closing tag -> */}
You can hide exports too. This is really useful if you want to experiment with a new component for example but want to keep a copy of the one you used before in case your experiment isn't fruitful.
{/* export const MyComponent = () => <span>Unusable</span> */}

export const MyComponent = () => <span>Usable</span>

<MyComponent /> {/* will show 'Usable' */}
Child Pages
Notion automatically places child pages into the content of the parent page. If these are not databases, it is safe to ignore them. Place them at the bottom of the page and simply ignore.
If you want to change this behavior, you can export a component called ChildPage. This hasn't been thoroughly tested yet so if you don't really know what you are doing, just wait a little bit more and we'll provide examples.
In case you change the behavior or your sub-page is a database that shouldn't be shown, remember you can hide content.